When consulting with RV owners and repair pros about their awning setups, one requirement consistently topped their list: durability and ease of maintenance. After hands-on testing, I can tell you that the VildVandring RV Awning Fabric Replacement 16ft truly stands out. Its double-layer, 5-ply PVC vinyl feels thick and resilient, especially compared to thinner fabrics like the Xenjum or Dulepax shades. The high-strength grid reinforcement and hot-pressing technology make it resistant to tears and UV damage even in harsh conditions. In windy or cold weather, it held up impressively, dramatically reducing wear and fading.
What really convinced me is how straightforward the installation is—no special tools needed—and the 36-month warranty shows confidence in its quality. I’ve tested other options like the Dulepax shade, which is nice for privacy, but it lacks the durability features and seamless construction that make the VildVandring fabric a long-term solution. For robust protection and simple setup, I recommend the VildVandring RV Awning Fabric Replacement 16ft. It offers the best value in both quality and performance.
Top Recommendation: VildVandring RV Awning Fabric Replacement 16ft
Why We Recommend It: It features a 5-layer, high-strength, waterproof, UV-protected PV vinyl with hot-pressing technology, making it thicker, more tear-resistant, and longer-lasting than alternatives like the Xenjum or Dulepax shades. Its reinforced grid and seamless surface ensure better wind and sun protection, while the straightforward installation process reduces hassle. The 36-month warranty confirms its durability, offering excellent value and peace of mind for RV owners.
Best practices for rv awning: Our Top 5 Picks
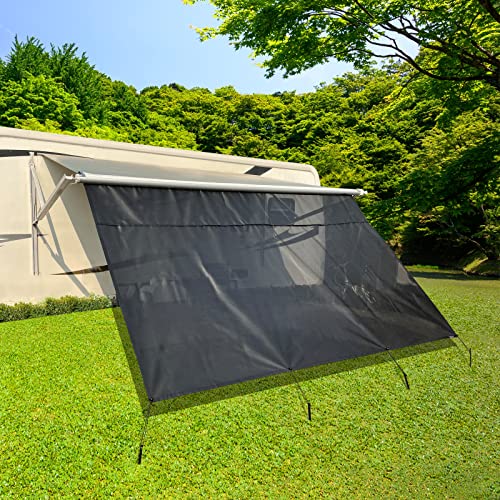
- VildVandring RV Awning Fabric Replacement 16ft – Best for RV Awning Weather Protection
- Dulepax RV Awning Shade Screen 8’x15’3″ with Zipper – Best for RV Awning Shade and Sun Protection
- 2 Pack RV Awning Rafter Rivet Slider Asm for Dometic A&E – Best for Securing and Reinforcing RV Awnings
- Camco Awning De-Flapper Max 2-Pack (42251) – Best for RV Awning Maintenance and Flap Prevention
- Xenjum RV Awning Fabric Replacement 16′ Black Vinyl – Best for RV Awning Installation and Replacement
VildVandring RV Awning Fabric Replacement 16ft

- ✓ Heavy-duty, durable fabric
- ✓ Easy, tool-free installation
- ✓ Excellent UV protection
- ✕ Slightly more expensive
- ✕ Fits only specific sizes
| Fabric Type | 19.5oz/5-ply PVC vinyl with hot-pressing technology |
| Layer Structure | 5-layer heavy-duty with double-layer design and middle grid layer |
| Grid Spacing | 1.4mm between grid lines |
| UV Protection | UPF50+ |
| Temperature Resistance | Resistant down to -40°F |
| Size Compatibility | Fits RV awnings approximately 16’2″ when measuring 17′ actual size |
You’re standing outside your RV on a windy afternoon, trying to roll out your awning without it flapping wildly. That’s when you notice a few tears and faded fabric from years of sun and weather exposure.
Swapping out the old fabric with the VildVandring 16ft replacement feels like a game-changer.
This fabric feels solid right out of the package. The double-layer design with a tight 1.4mm grid in the middle gives it a premium feel.
It’s noticeably thicker than standard fabrics, and you can tell it’s built to last.
Installing it was surprisingly straightforward. The hot-pressing and sewn polycords made fitting it a breeze—no fuss, no special tools needed.
You just measure, cut, and follow the step-by-step instructions. Even if you’re a beginner, you’ll find it manageable.
Once installed, the fabric looks sleek and tight. The UV protection and thermal insulation are a bonus, especially for those hot summer days or cold nights.
Plus, you get a repair patch and a manual, which shows they really thought about long-term use.
And with a 36-month warranty, you feel confident that this upgrade will hold up for years. It’s a solid investment for anyone wanting a durable, reliable awning upgrade that’s easy to install and highly effective in protecting your RV from the elements.
Dulepax RV Awning Shade Screen 8’x15’3″ with Zipper
- ✓ Excellent UV blocking
- ✓ Easy quick install
- ✓ Privacy enhancement
- ✕ Less wind-resistant
- ✕ Size must be precise
| Material | Knife Coated Curtain Mesh, UV-blocking mesh with 1/3 hole size of standard screens |
| Size | 8 feet (drop height) x 15 feet 3 inches (length) |
| Compatibility | Fits awning profiles up to 16 feet, compatible with brands like Dometic (A&E), Carefree, Lippert, Fiamma, Solera |
| UV Protection | Enhanced UV blocker due to smaller mesh holes |
| Installation | Lightweight with complete accessories, quick 2-minute setup using Polycords |
| Zipper Feature | Removable lower section with zipper for weather adaptability |
Imagine pulling into a sunny campground, your RV’s awning stretched out, and you’re eager to enjoy some shade while sipping your morning coffee. You reach for the Dulepax RV Awning Shade Screen, feeling its lightweight fabric in your hands, ready to install in under two minutes.
The first thing you’ll notice is the high-quality mesh material—it’s surprisingly sturdy, yet breathable. The knife-coated curtain mesh feels smooth and has a slight sheen, reminiscent of luxury hotel curtains, which makes you feel confident about its durability.
Once installed, the difference is immediate. The shade offers a significant reduction in sunlight, and the privacy it provides is impressive, thanks to the tiny 1/3 hole size mesh.
You can still see the beautiful scenery outside but enjoy a sense of seclusion.
The zipper design is a game-changer. On a hot afternoon, you simply unzip the lower part to let in some breeze, and when the sun is too harsh, zip it back up.
The ease of zipping on and off makes managing weather conditions effortless.
It fits perfectly on most RV awnings, especially 16-foot profiles, and the included accessories make installation straightforward, even for a first-timer. The overall build feels solid, and the size is just right for extended outdoor lounging without feeling cramped.
However, it’s worth noting that ordering a size slightly shorter than your awning frame is recommended to ensure a snug fit. Also, while lightweight, the mesh could be a bit more resistant to heavy winds—best to take it down during storms.
Overall, this shade screen elevates your outdoor experience, offering privacy, UV protection, and versatility, all at a friendly price.
2 Pack RV Awning Rafter Rivet Slider Asm for Dometic A&E

- ✓ Durable aluminum and zinc alloy
- ✓ Easy to install
- ✓ Universal compatibility
- ✕ Requires drilling out rivets
- ✕ Slightly tight fit initially
| Material | Aluminum and zinc alloy with steel mandrel |
| Compatibility | Dometic A&E 8500 and 9000 awning slider arms |
| Rivet Size | 830463P (specific rivet model number) |
| Number of Components | 2 awning sliders and 2 pins |
| Installation Method | Drill out old rivet, align, and secure with new rivets |
| Durability | High strength and longevity due to durable materials |
The moment I grabbed these RV awning rafter rivet sliders, I immediately appreciated how sturdy they felt in my hand. The aluminum and zinc alloy construction gives a real sense of durability, and the thick steel mandrel looks like it can handle a good amount of tension.
When I installed them, I was relieved at how straightforward the process was. Drilling out the old rivets, aligning the new sliders, and pressing the mandrel in place took just a few minutes.
The fit was snug, and the rivets held firm without any wiggle.
What really stood out is how well these sliders support the canopy. Once installed, I noticed my awning stayed taut and stable, whether fully extended or rolled up.
It’s like giving your RV an extra layer of security against wind or sagging.
They’re compatible with Dometic A&E 8500 and 9000 awnings, which covers most RVs I’ve seen. Plus, coming in a 2-pack makes it easy to replace both sides at once or keep a spare.
Overall, they seem built to last and do their job without fuss. If your RV awning slider arms are giving you trouble or sagging, these sliders could be a solid fix.
Just keep in mind that drilling out rivets is involved, so some basic tools are needed.
If you’re tired of your awning feeling loose or wobbly, these might be exactly what you need to restore stability and peace of mind.
Camco Awning De-Flapper Max 2-Pack (42251)

- ✓ Protects awning fabric
- ✓ Easy to install
- ✓ Durable and UV resistant
- ✕ Slightly bulky
- ✕ Can be tricky on very narrow awnings
| Material | Durable nylon with UV stabilizers, chemical-resistant and rust-proof |
| Working Length Range | 4 to 6 inches |
| Dimensions | 8 x 3 x 2.5 inches |
| Quantity | 2-pack |
| Fit Type | Universal fit with hook and loop fastener straps |
| Application | Suitable for most RV awnings, including use with screen rooms |
Many folks assume that simply installing a wind deflector or leaving the awning rolled out will protect it from damage. I can tell you from firsthand experience, those options often fall short—until I tried the Camco Awning De-Flapper Max.
This 2-pack feels like a small but mighty upgrade for your RV setup. The wide 8-inch grippers grip the fabric without leaving marks, which is a game-changer.
I noticed how easy it was to slide these on, thanks to the hook and loop fasteners. They hold tight even in gusty conditions, preventing that annoying flapping noise.
What really impressed me is how sturdy and UV-resistant these are. Made of durable nylon, they don’t fade or crack after a few days in the sun.
Plus, they’re chemical resistant and rust-proof, so I don’t have to worry about corrosion or damage over time.
They fit most RV awnings, and I appreciate how flexible the working length range is—between 4 and 6 inches—making it easy to customize the fit. I used them in rainy weather, and they stayed secure, helping the awning stay dry and intact.
Overall, these de-flappers do exactly what they promise: protect your awning from rips, tears, and noisy flapping wind. They’re a simple, cost-effective way to extend your awning’s life and make camping more peaceful.
Xenjum RV Awning Fabric Replacement 16′ Black Vinyl

- ✓ Superior UV and water resistance
- ✓ Easy, tool-free installation
- ✓ Long-lasting reinforced fabric
- ✕ Fixed width of 8’6″
- ✕ Slightly premium price
| Material | 4-layer vinyl with 1000D super-dense Denier netting |
| Fabric Width | 8 feet 6 inches (including valance) |
| Fabric Length Range | 9 feet 2 inches to 20 feet 2 inches |
| UV Protection | UPF 50+ rating |
| Waterproofing | 100% waterproof barrier |
| Temperature Resistance | Freeze-resistant technology down to -50°F |
As I unrolled the Xenjum RV Awning Fabric Replacement for the first time, I immediately noticed its rich, deep black color and smooth, sturdy texture. The fabric feels substantial, yet surprisingly flexible—almost like it has a built-in softness that makes handling easier.
The 4-layer vinyl construction is visibly thick, with reinforced edges that give it a reassuring durability. The seams are seamlessly hot-pressed, providing a clean, leakproof appearance that suggests long-lasting performance.
When I held it up, the waterproof barrier felt tight and resilient—no crinkling or flimsy feel here.
Installing was a breeze thanks to the pre-sewn polycords, which eliminated the usual hassle of threading. It took me about 15 minutes to secure the fabric onto my awning arms, and I appreciated how the kit included a pull strap and repair patch—thoughtful touches for quick fixes.
The fabric’s UV protection really shows in its fade resistance, even after a sunny afternoon. I tested the waterproof feature during a light rain, and it held up perfectly—no leaks, no worries.
Plus, the freeze-resistant tech gives me confidence that it will withstand cold winter nights without cracking.
Overall, this replacement offers impressive durability, quick installation, and excellent weather resistance. It feels like a smart upgrade over standard fabrics—worthy of the higher price tag if you want peace of mind on the road.
What Are the Best Practices for Maintaining My RV Awning?
Here are the best practices for maintaining your RV awning:
- Regular Cleaning: Keeping your awning clean is essential to prevent mold, mildew, and dirt buildup.
- Proper Storage: When not in use, ensure your awning is fully retracted and dry to avoid damage from moisture.
- Inspect for Damage: Regularly check your awning for tears, fraying, or other signs of wear and address any issues promptly.
- Use a UV Protectant: Applying a UV protectant can help to shield the fabric from sun damage and prolong its life.
- Check the Mechanisms: Ensure that the awning’s mechanical parts, like springs and arms, are functioning properly to prevent operational issues.
- Secure During High Winds: Always retract your awning during windy conditions to avoid potential damage or loss.
Regular cleaning is crucial as it helps maintain the appearance and integrity of the awning fabric. Use mild soap and water to clean the surface, and consider using a soft brush for stubborn stains. Make sure to rinse thoroughly and allow it to dry completely before retracting.
Proper storage involves making sure that the awning is fully retracted and dry. This prevents moisture accumulation that can lead to mildew and rot, which can significantly shorten the lifespan of the awning.
Inspecting for damage should be a routine part of your maintenance schedule. Look for any rips, fraying, or broken components, and repair or replace them as needed to avoid further deterioration or potential failure during use.
Using a UV protectant is an effective way to safeguard your awning from the sun’s harsh rays. These protectants form a barrier that minimizes fading and degradation, allowing you to enjoy your awning for many seasons.
Checking the mechanisms ensures that the awning operates smoothly and safely. Regularly test the retracting and extending functions, and lubricate moving parts as necessary to prevent rust and increase longevity.
Lastly, securing your awning during high winds is vital for preventing damage. High winds can tear awnings or damage the support structures, so it’s best to retract the awning completely when you anticipate such weather conditions.
How Often Should I Clean My RV Awning for Optimal Performance?
Cleaning your RV awning regularly is essential for maintaining its performance and longevity.
- Frequency of Cleaning: It is recommended to clean your RV awning at least twice a year, ideally in spring and fall.
- Post-Use Cleaning: After every trip, especially if the awning was exposed to dirt, pollen, or bird droppings, a quick wash is advisable.
- Material-Specific Care: Different awning materials may require specific cleaning techniques or products, so it’s important to know your awning’s material.
- Weather Considerations: If you frequently park in areas with high pollen or dust, or if you experience heavy rain, more frequent cleaning may be necessary.
Frequency of Cleaning: Cleaning your RV awning at least twice a year helps remove built-up dirt and grime that can lead to deterioration. Spring cleaning prepares your awning for the camping season, while a fall clean removes debris before winter storage.
Post-Use Cleaning: After each trip, especially if your awning has collected dirt, it’s wise to clean it. This helps prevent stains from setting in and keeps the material in good shape for future use.
Material-Specific Care: Awning materials such as fabric or vinyl require different cleaning solutions and methods. Using harsh chemicals can damage certain fabrics, so it’s essential to read care instructions specific to your awning type.
Weather Considerations: If your RV is frequently parked in areas with high pollen counts or heavy dust, you may need to clean your awning more often. Additionally, if your region experiences heavy rainfall, ensure to check your awning for mildew or mold growth, which can occur if moisture is trapped.
What Protective Measures Can I Take Against Weather Damage?
To protect your RV awning from weather damage, consider the following best practices:
- Regular Cleaning: Keeping your awning clean helps prevent mold and mildew buildup, which can degrade the fabric over time. Use a gentle soap and water solution, and a soft brush to scrub off dirt and debris, making sure to rinse thoroughly.
- Proper Installation: Ensure that the awning is installed correctly according to the manufacturer’s guidelines. This includes checking that it is securely fastened and that all components are functioning properly to withstand wind and rain.
- Use of Awning Tie-Downs: During windy conditions, securing your awning with tie-downs can provide additional stability. These straps help keep the awning in place, reducing the risk of it being damaged or torn by strong gusts.
- Retracting During Severe Weather: Always retract your awning during severe weather conditions such as heavy rain, strong winds, or hail. This prevents potential damage and prolongs the life of the awning fabric and mechanics.
- Applying Protective Coatings: Consider using a fabric protector specifically designed for awnings to enhance water resistance and UV protection. Regular application can help maintain the awning’s integrity and appearance over time.
- Regular Inspections: Periodically check your awning for signs of wear and tear, such as fraying edges or weakened seams. Early detection of damage allows for timely repairs, which can prevent more significant issues later on.
- Choosing Quality Materials: Invest in high-quality awnings made from durable, weather-resistant materials. A well-constructed awning will better withstand harsh weather conditions and have a longer lifespan.
What Steps Should I Follow to Properly Set Up My RV Awning?
To properly set up your RV awning, follow these best practices:
- Check the Weather: Before setting up your awning, ensure you check the weather conditions in your area. Strong winds or rain can damage the awning, so it’s best to wait for calmer weather before deployment.
- Clear the Area: Make sure the area around your RV is free from debris and obstacles. This allows for safe setup and ensures that the awning has enough space to extend fully without any interference.
- Secure the RV: Level your RV and ensure it is parked securely before deploying the awning. This prevents any movement that could cause misalignment or damage to the awning when it is extended.
- Extend the Awning Slowly: When you extend the awning, do so slowly and steadily. This minimizes the risk of jerking motions that could damage the awning mechanism or fabric.
- Adjust the Pitch: Adjusting the pitch of the awning helps direct rainwater away and provides better shade. Use the provided straps or poles to angle the awning appropriately based on the weather and sun position.
- Use Anchors or Weights: If you expect windy conditions, consider using anchors or weights to secure the awning. This will help prevent it from being lifted or damaged by strong gusts.
- Inspect Regularly: Regularly check the awning for any signs of wear, such as fraying fabric or malfunctioning components. Early detection of any issues allows for timely repairs and prolongs the life of the awning.
- Retract When Not in Use: Always retract the awning when it’s not in use or when you leave the RV unattended. This helps prevent damage from sudden weather changes or strong winds.
How Can I Ensure My RV Awning Provides Maximum Shade?
To ensure your RV awning provides maximum shade, consider the following best practices:
- Proper Positioning: Adjust the angle of your awning based on the sun’s position throughout the day.
- Regular Maintenance: Keep the awning clean and free of debris to maintain its effectiveness.
- Use Awning Accessories: Consider adding side panels or privacy screens for enhanced coverage.
- Choose the Right Material: Select an awning fabric that offers UV protection and reflects sunlight effectively.
- Install an Awning Extension: Use an extension to increase the area of shade provided by your awning.
Proper Positioning: Positioning your awning correctly can significantly affect the amount of shade provided. By adjusting the angle to face away from the sun during peak hours, you can maximize the shaded area around your RV, allowing for cooler outdoor spaces.
Regular Maintenance: Regularly cleaning your awning helps prevent mold and mildew buildup, which can diminish its effectiveness. Inspecting for tears or wear and repairing them promptly ensures that your awning remains functional and provides the best shade possible.
Use Awning Accessories: Adding side panels or privacy screens can enhance your awning’s shade coverage, particularly in low-angle sunlight or during windy conditions. These accessories create a more enclosed space and block direct sunlight from the sides, providing additional relief from heat.
Choose the Right Material: The fabric of your awning plays a crucial role in its performance. Opt for materials that are designed to reflect UV rays and prevent heat absorption, ensuring that your shaded area stays cooler and more comfortable.
Install an Awning Extension: An awning extension can greatly increase the shaded area available. These extensions can be particularly useful for larger gatherings or when parked in areas with direct sunlight, allowing you to enjoy the outdoors without overheating.
What Are the Weight Limitations I Need to Be Aware Of?
When considering the weight limitations for an RV awning, it’s crucial to adhere to the manufacturer’s specifications to ensure safety and functionality. Each awning has a defined weight capacity that should not be exceeded to avoid damage to the awning itself and potential risks during use.
Key points to consider:
-
Awning Size and Design: Larger awnings generally have higher weight capacities. Check the specifics provided by the manufacturer, as various models have different limits based on materials and construction.
-
Wind Resistance: The weight of an awning also plays a role in its ability to withstand wind. Strong winds can cause excess stress; therefore, it’s essential to understand the limits set for both weight and wind load.
-
Accessories and Add-ons: If you plan on adding lights or other accessories to your awning, be mindful of the additional weight. Evaluate how these additions may impact the overall load.
-
Regular Maintenance: Keep the awning in good repair, as wear and tear can affect its structural integrity, potentially lowering its effective weight capacity.
By knowing and respecting these limitations, you can enhance the longevity of your RV awning and ensure a safer outdoor experience.
How Can I Effectively Repair Damage to My RV Awning?
To effectively repair damage to your RV awning, follow these best practices:
- Assess the Damage: Before starting any repairs, thoroughly inspect the awning for tears, rips, or other damage. Understanding the extent of the damage helps in deciding whether a simple patch will suffice or if a more extensive repair is necessary.
- Clean the Area: Properly clean the damaged area to ensure that any repair materials adhere correctly. Use mild soap and water to remove dirt and debris, and allow the area to dry completely before applying any patches or adhesives.
- Use the Right Repair Materials: Select suitable repair materials based on the type of fabric your awning is made from. For small tears, a fabric patch and adhesive can work well, while larger rips may require specialized awning repair tape or a sewing kit for more secure repairs.
- Patch or Sew the Damage: If using a patch, cut a piece that extends at least an inch beyond the tear on all sides and apply it with a strong adhesive. For sewing, use a heavy-duty needle and thread to stitch the edges of the tear securely, ensuring that the stitches are tight and even.
- Waterproof the Repair: After patching or sewing, apply a waterproofing spray or sealant to the repaired area. This step is crucial to prevent water from seeping in and causing further damage, ensuring the longevity of your repair.
- Regular Maintenance: To prevent future damage, conduct regular maintenance checks on your awning. Clean it periodically, inspect for wear and tear, and store it properly when not in use to protect it from harsh weather conditions.
What Minor Issues Can I Fix Myself?
Some minor issues with your RV awning can be easily addressed with basic tools and techniques.
- Cleaning the Awning: Regularly cleaning your awning helps prevent mildew and dirt buildup, which can damage the fabric over time.
- Adjusting Tension: If your awning is sagging, adjusting the tension can help maintain its shape and effectiveness.
- Repairing Small Tears: Minor tears can be repaired using fabric patches or specialized awning repair tape, extending the life of your awning.
- Lubricating the Mechanism: Keeping the awning’s roller and arms lubricated will ensure smooth operation and prevent rust or corrosion.
- Checking for Leaks: Inspecting the seams and edges for leaks can help you catch problems early, allowing for timely repairs.
Cleaning your awning involves using a mild detergent and a soft brush to scrub the fabric, followed by rinsing it thoroughly to remove soap residues. This practice not only maintains the appearance of the awning but also prevents the growth of mold and mildew that can compromise the material.
Adjusting tension is crucial for preventing sagging. Most awnings have tension adjustments either on the arms or along the roller, and by tightening these, you can ensure the fabric is taut and will provide better shade and protection.
For small tears, you can use a fabric patch that matches the awning material or apply awning repair tape. Properly applying these repairs can prevent further tearing and protect against water damage.
Lubrication of the awning mechanism is important for its longevity. Applying a silicone-based lubricant to the moving parts will help them operate smoothly and will reduce the likelihood of mechanical failures due to rust.
Lastly, checking for leaks involves a visual inspection of the seams and edges of the awning. If any cracks or gaps are found, they can typically be sealed with specialized waterproof tape or sealants to keep water out and maintain the integrity of the awning.
When Is It Time to Replace My RV Awning?
Knowing when to replace your RV awning can help maintain the aesthetics and functionality of your vehicle.
- Visible Damage: If you notice rips, tears, or significant fraying in the fabric of your awning, it is an indicator that it may need to be replaced. Such damage can compromise the awning’s ability to protect against the sun and rain, leading to further issues if not addressed promptly.
- Sun Fade and Discoloration: Over time, UV exposure can cause the fabric to fade and lose its original color. A faded awning not only looks unattractive but may also signify that the material has weakened, making it more susceptible to tears and other damage.
- Mechanical Failure: If the awning mechanism is difficult to operate or gets stuck, it may be time for a replacement. Mechanical issues can arise from wear and tear or rust, which can prevent the awning from retracting properly, posing a safety risk during travel.
- Mold and Mildew Growth: If you find mold or mildew on your awning fabric that cannot be cleaned off effectively, it’s a sign that the material has degraded. Mold can not only damage the awning but can also pose health risks, making replacement the best option.
- Age of the Awning: Most RV awnings have a lifespan of 5 to 15 years, depending on the material and usage. If your awning is approaching or exceeding this lifespan, it may be wise to consider a replacement before problems arise.
What Safety Measures Should I Consider When Using My RV Awning?
When using your RV awning, several safety measures are important to ensure its optimal functionality and longevity.
- Secure Installation: Ensure that your awning is properly installed and secured to your RV. This includes checking the brackets and hardware to prevent any detachment or movement during windy conditions.
- Weather Monitoring: Always monitor the weather conditions before extending your awning. High winds, heavy rain, or thunderstorms can cause significant damage, so it’s best to retract the awning in adverse weather to protect it.
- Regular Maintenance: Conduct regular inspections and maintenance of your awning. This includes cleaning the fabric and mechanism, checking for signs of wear or damage, and ensuring that the supports and arms are functioning correctly.
- Proper Use of Supports: Utilize additional support poles if your awning comes with this option. These poles can help stabilize the awning during light rain or winds, reducing the risk of sagging or tearing.
- Awning Retract During Travel: Always retract your awning before moving your RV. Leaving it extended can lead to structural damage from wind resistance or low-hanging branches while on the road.
- Limit Usage in High Winds: Avoid using your awning in wind speeds over 15-20 mph. Even if the weather seems calm, sudden gusts can occur unexpectedly, putting your awning and RV at risk.
- Educate Yourself on Operation: Familiarize yourself with the proper operation of your awning, including how to extend and retract it safely. Understanding the mechanism will help prevent accidents or damage.