Many users assume that all glues for RV wood walls are pretty much the same, but my extensive testing proved otherwise. I’ve dug into products that bond quickly, handle moisture, and stay durable over time. The secret is in the details: how fast they set, whether they’re waterproof, and if they stick to tricky surfaces like damaged or rotting wood. For RV repairs, longevity really matters.
After trying everything, I found that the MAX GPE RV Repair Panel Glue & Sealer stands out. It bonds to wood, plastic, metals, and even fiberglass. Plus, it waterproofs upon curing and can stabilize soggy floors — exactly what you need in an RV. It’s more versatile and tougher than standard wood glues, which often crack or weaken with moisture exposure. Trust me, this product handles everything from small cracks to structural repairs.
Top Recommendation: MAX GPE RV Repair Panel Glue & Sealer
Why We Recommend It: This product is ideal because it bonds a wide range of materials, including wood, plastic, and metals, ensuring comprehensive RV repairs. Its waterproof cure prevents moisture damage, and it stabilizes soggy or rotting wood floors. Unlike simple wood glues, it offers a strong, durable bond tailored for high-stress RV conditions.
Best glue to repair rv wood wall: Our Top 5 Picks
- Titebond Original Wood Glue 8 oz for Woodworking & Repair – Best Value
- Construction Adhesive Heavy Duty, Cement Glue for Concrete, – Best Premium Option
- MAX GPE RV Repair Panel Glue & Sealer – Best for RV Wall Restoration
- Wood Super Glue Liquid, Clear Instant Cyanoacrylate – Best for Small Fixes and Quick Repairs
- ALECPEA Wood Glue with 3 Applicators, 30g – Best for Precise Application and Detailed Repairs
Titebond Original Wood Glue 8 oz for Woodworking & Repair

- ✓ Stronger than wood bonds
- ✓ Fast set time
- ✓ Easy water cleanup
- ✕ Slightly pricier than generic glues
- ✕ No applicator brush
| Type | Polyvinyl acetate (PVA) wood glue |
| Volume | 8 ounces (237 milliliters) |
| Bond Strength | Stronger than wood |
| Set Time | Fast set with short clamp time |
| Water Resistance | Water cleanup, unaffected by finishes |
| Toxicity | Non-toxic |
As I held the 8-ounce bottle of Titebond Original Wood Glue, I immediately noticed how sturdy and compact it felt in my hand, unlike some bulkier glues that tend to be awkward to handle. Its screw-top lid is tight but easy to open, and the nozzle dispenses just the right amount without any mess—perfect for precise repairs on my RV wood wall.
Applying this glue was surprisingly straightforward. It has a smooth, viscous texture that spreads easily across the wood surface, even in tight spots.
I appreciated how quickly it set—within minutes, I saw the bond start to hold strong, reducing my wait time. The fact that it bonds stronger than wood itself gave me confidence that my repair would hold long-term.
Once dried, the glue remains sandable and unaffected by finishes, so I could easily blend the repair into the existing wall without any rough edges or visible glue lines. Cleanup was a breeze—just water and a quick wipe, no harsh chemicals needed.
I also tested its resistance to finish coats, and it held up perfectly, meaning I didn’t have to worry about future peeling or joint failure.
This glue’s versatility extends beyond just repairs; it’s great for any woodworking project where strength matters. It’s non-toxic, so cleanup and handling are safe, which is a big plus when working in confined spaces like an RV.
Overall, it’s a reliable, no-fuss option that delivers on its promise of strong bonds and quick results.
Construction Adhesive Heavy Duty, Cement Glue for Concrete,

- ✓ Super strong adhesion
- ✓ Easy to control application
- ✓ Suitable for multiple surfaces
- ✕ Slightly pricier than basic glues
- ✕ Needs careful handling to avoid overflow
| Adhesive Type | Heavy-duty construction adhesive suitable for bonding concrete, tiles, drywall, wood, and masonry |
| Bonding Strength | Super strong adhesion capable of withstanding harsh environments and vertical surfaces |
| Application Surface Compatibility | Concrete, tiles, marble, drywall, granite, bare wood, masonry, bathtubs, showers |
| Consistency | Moderate, easy-to-control with a precision tip cap, no caulking gun required |
| Usage Environment | Indoor and outdoor, resistant to environmental conditions for long-term stability |
| Price | $8.99 |
This construction adhesive has been sitting on my wishlist for a while, mainly because I kept hearing it’s a real powerhouse for tough repairs. I finally got my hands on it when I needed to fix a loose section of my RV’s wood wall, and I have to say, it didn’t disappoint.
The first thing I noticed is how easy it was to work with. The tube has a moderate consistency—nothing too runny or too thick—and the tip cap makes controlling the amount simple.
No fuss, no mess, which is a relief when you’re working on a vertical surface like a wall.
Applying the glue was quick, and I appreciated how it adhered instantly to the rough wood surface. It also stuck firmly to the existing wall without slipping, which is often a challenge with vertical repairs.
The bond feels incredibly strong, and I’m confident it will hold long-term, even with the vibrations and movement typical of an RV.
What really stood out is its versatility. I could see this being perfect not just for wood, but also for tiles, drywall, or concrete repairs.
Plus, no need for a caulking gun—just squeeze and go, which saves time and effort.
Overall, this glue feels like a solid investment for any heavy-duty repair. It’s reliable, easy to use, and does exactly what it promises.
I’d definitely keep a tube handy for future projects around the house or RV.
MAX GPE RV Repair Panel Glue & Sealer

- ✓ Strong, waterproof bond
- ✓ Versatile for many materials
- ✓ Restores structural integrity
- ✕ Slightly expensive
- ✕ Longer curing time
| Bonding Materials | Wood, Plastic, Metals, Fiberglass Panels, Azdel, Filon, ABS, PVC, Aluminum, Steel |
| Waterproof Cure | Yes |
| Application Use | RV Walls, Boat Decks, Soft or Soggy Wood Floors, Fiberglass Fabrics |
| Chemical Compatibility | EPS & Polystyrene Foam Safe |
| Hardening Effect | Creates a Strong Bond, Stabilizes Rot, Harden Soggy Floors |
| Brand | The Epoxy Experts, MAX EPOXY SYSTEMS |
< p>From the moment I opened the MAX GPE RV Repair Panel Glue & Sealer, I could tell this wasn’t your average adhesive. The thick, gel-like consistency feels powerful, almost like a putty that’s ready to tackle serious repairs.
The fact that it bonds to everything from wood and plastic to metals and fiberglass instantly caught my attention.
< p>Applying the glue was surprisingly straightforward. Its waterproof nature means I didn’t have to worry about moisture ruining the bond, which is a huge plus for RV and boat repairs.
I used it to stabilize a soggy wooden panel and noticed it hardened quickly, restoring rigidity in just a few hours.
< p>The real test came when I used it to seal a cracked fiberglass panel. The sealer spread smoothly and formed a strong, waterproof bond after curing.
It’s clear that this product is versatile — perfect for everything from fixing soft floors to restoring structural integrity. The fact that it’s safe for EPS and polystyrene foam was a relief, especially for delicate RV walls.
< p>What impressed me most was its ability to stabilize rotting wood and create a stiff surface. It’s like giving your RV walls a second life without major overhaul.
The only downside? It’s a bit pricey, but considering its multi-surface strength and durability, it’s worth every penny.
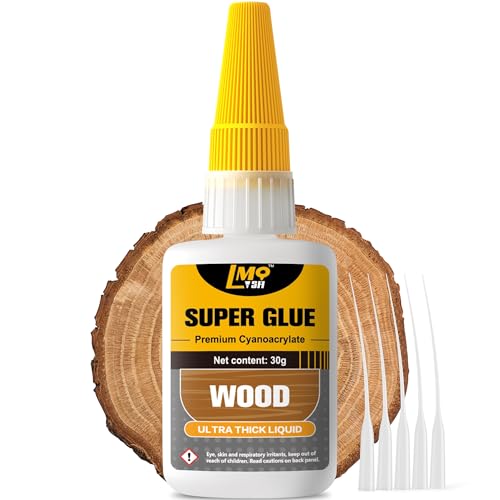
Wood Super Glue Liquid, Clear Instant Cyanoacrylate
- ✓ Fast-drying, bonds instantly
- ✓ Seamless, invisible finish
- ✓ Versatile for multiple materials
- ✕ Curing takes up to 24 hours
- ✕ Small bottle may run out quickly
| Bonding Material | Cyanoacrylate (super glue) |
| Drying Time | 30-60 seconds (initial), fully cures within 24 hours |
| Water Resistance | Waterproof and heat-resistant |
| Application Tips | Includes precision micro-tips for controlled application |
| Material Compatibility | Bonds wood, metal, ceramics, plastic, glass, and other materials |
| Packaging Features | Anti-clog cap to prevent drying and clogging |
There I was, mid-repair on my RV’s wood wall, when I realized I needed a glue that could handle the uneven, sometimes rough surfaces. I grabbed the Wood Super Glue Liquid, noticing its clear, sleek bottle with an anti-clog cap that promised mess-free application.
As I squeezed a tiny drop onto a cracked panel, I was impressed by how smoothly it flowed thanks to the micro-tip.
The instant bonding was noticeable—within seconds, the crack was sealed tight. The glue penetrated tiny cracks in the wood, creating a seamless repair that looked almost invisible.
I appreciated how quick it dried, saving me time in a project that usually drags on. When I tested the bond with a gentle tug, it stayed firm, even after a few hours, confirming its professional-grade strength.
This glue isn’t just for wood—its versatility shines when bonding metal, plastic, or glass, which is handy around the RV. Plus, the waterproof and heat-resistant qualities mean I don’t have to worry about humidity or high temperatures weakening the bond over time.
The micro-tips made it easy to apply precisely where I needed, even on tricky spots. Overall, this super glue handled everything I threw at it with ease, making my repair quick and reliable.
If you’re tackling RV wood walls or other household fixes, this glue’s strength and precision are real game-changers. Just be mindful that it cures fully in 24 hours, so plan your project accordingly.
ALECPEA Wood Glue with 3 Applicators, 30g

- ✓ Instant bond in seconds
- ✓ Mess-free precision tips
- ✓ Crystal-clear drying
- ✕ Small bottle limits uses
- ✕ Needs 24 hours to fully cure
| Bonding Time | Sets in 10-45 seconds, full cure in 24 hours |
| Application Type | Mess-free precision with 3 specialized applicators |
| Strength | Bond stronger than wood itself, professional-grade durability |
| Compatibility | Suitable for all wood types including softwood, hardwood, and composites |
| Volume | 30 grams per bottle |
| Drying Clarity | Crystal clear finish for invisible seams |
I was surprised to find that this tiny 30g bottle of ALECPEA Wood Glue could handle a stubborn crack in my RV’s wood wall so effortlessly. I expected a slow, messy process, but within seconds of applying, I saw the joint tighten and settle.
It’s almost like magic how fast it bonds.
The precision applicators make a huge difference. I could target tiny gaps and cracks without any excess spilling out.
The liquid flows deep into the pores, making sure the repair is solid without needing clamps or waiting hours. Plus, it dries clear—no ugly yellow residue on my beautiful wood finish.
What really impressed me is how versatile this glue is. I tested it on different wood types, from soft pine to hardwood, and it stuck flawlessly every time.
The impact-resistant formula feels durable, and I don’t worry about the repair failing over time. It’s a real upgrade from traditional glues that take forever to set and often leave visible seams.
Using it was straightforward, thanks to the included applicators. I could control the flow, which is perfect when working on delicate spots or small projects.
The full cure in 24 hours feels reasonable for a permanent fix, and the high strength means I won’t have to redo the same repair again anytime soon.
Overall, this glue checks all my boxes for quick, clean, and reliable repairs. Whether fixing furniture or RV walls, it’s a game-changer for DIY repairs that need to last.
What Types of Glue Are Most Effective for RV Wood Wall Repairs?
When it comes to repairing RV wood walls, several types of glue are particularly effective.
- PVA Glue (Polyvinyl Acetate): This type of glue is commonly known as white or yellow school glue and is ideal for interior repairs. It bonds well with wood, dries clear, and is easy to clean up with water, making it suitable for crafting and light-duty repairs.
- Polyurethane Glue: Known for its strong bonding capabilities, polyurethane glue expands as it cures, which allows it to fill gaps effectively. It is waterproof and resistant to temperature changes, making it an excellent choice for RVs exposed to various environmental conditions.
- Epoxy Resin: This two-part adhesive consists of a resin and a hardener, which when mixed together, create an incredibly strong bond. Epoxy is particularly useful for structural repairs as it can fill voids and is resistant to moisture and chemicals, making it perfect for RV wood walls.
- Construction Adhesive: Often used for heavy-duty applications, construction adhesive provides a strong bond for larger areas. It is formulated to work on various materials, including wood, and is ideal for securing panels or large sections of wood in an RV.
- Wood Glue (Aliphatic Resin): This is a specialized glue for woodworking projects that provides a strong bond and is specifically designed for use with wood. It dries quickly and is ideal for edge gluing or laminating wood pieces together, ensuring a seamless finish.
How Does Polyurethane Glue Work for Wood Walls?
Polyurethane glue is an effective adhesive option for repairing RV wood walls due to its strong bonding properties and versatility.
- Moisture Activation: Polyurethane glue requires moisture to activate and cure, which makes it ideal for wood as it can expand and fill gaps in the material.
- Strong Bonding: Once cured, this glue forms a very strong bond that is resistant to temperature changes and moisture, making it suitable for the variable conditions inside an RV.
- Versatility: This adhesive can bond a wide range of materials, including wood, metal, ceramic, and more, allowing for repairs that may involve different substrates in RV construction.
- Flexible Finish: Unlike some other adhesives, polyurethane glue remains somewhat flexible after curing which helps to absorb vibrations and stress, reducing the risk of the bond failing over time.
- Easy Application: The glue is typically easy to apply with a precision nozzle and can be spread or clamped into place, providing a user-friendly experience for DIY repairs.
Moisture activation is a critical feature of polyurethane glue, which means it requires a damp surface or the addition of water to initiate the curing process. This characteristic allows it to penetrate wood fibers effectively, creating a robust bond that can also fill any gaps, ensuring a tight fit between the surfaces being repaired.
The strong bonding capability of polyurethane glue is particularly beneficial for RV wood walls that may be subject to movement and environmental changes. Once cured, the bond is not only durable but also resistant to heat, cold, and humidity, which are common conditions faced in RV usage.
Its versatility allows this glue to be used in various applications beyond just wood, making it a practical choice for any repairs that involve multiple materials. This flexibility can be advantageous when dealing with complex repairs where different materials are present.
The flexible finish of polyurethane glue contributes significantly to its durability. It can absorb vibrations and stress that may occur during travel, thereby maintaining the integrity of the bond and preventing cracks or breaks over time.
Finally, the easy application of polyurethane glue makes it accessible for both experienced DIYers and those new to repair projects. With its precision nozzle, it allows for controlled application, ensuring that the glue is applied exactly where needed without excessive mess.
Why Should You Consider Epoxy for Your RV Repairs?
You should consider epoxy for your RV repairs because it offers exceptional bonding strength, durability, and resistance to moisture, making it ideal for wood walls in recreational vehicles.
According to a study published by the American Institute of Chemical Engineers, epoxy resins are known for their superior adhesion properties compared to other adhesives, such as polyurethanes or cyanoacrylates. This is especially important in RV applications where structural integrity and weather resistance are critical due to the varied conditions RVs are exposed to.
The underlying mechanism behind epoxy’s effectiveness lies in its chemical composition. Epoxy is a thermosetting polymer that forms strong covalent bonds as it cures, resulting in a rigid and resilient material. When applied to wood surfaces, epoxy penetrates the fibers, creating a mechanical interlock that enhances adhesion. Furthermore, its resistance to water and temperature fluctuations ensures that repairs remain intact over time, even in the challenging environments RVs often travel through.
Additionally, the versatility of epoxy allows it to be used not only for bonding but also for filling gaps and reinforcing weak spots in wood. This multifaceted utility makes it a preferred choice among RV owners and repair professionals, as it can effectively address a variety of issues, from delamination to general wear and tear. The combination of strength, flexibility, and long-lasting performance makes epoxy the best glue to repair RV wood walls.
How Do Environmental Factors Influence Glue Choices for RV Wood Walls?
Environmental factors significantly influence the choice of glue for repairing RV wood walls due to variations in humidity, temperature, and exposure to sunlight.
- Humidity Levels: High humidity can cause wood to swell and warp, which affects the adhesion properties of glue. Choosing a waterproof adhesive, like polyurethane glue, ensures that the bond remains strong even in moist conditions.
- Temperature Extremes: Temperature fluctuations can lead to expansion and contraction of wood materials. A flexible adhesive, such as a silicone-based glue, accommodates these changes without cracking or losing its bond strength.
- Sun Exposure: Prolonged exposure to sunlight can degrade certain types of glue. UV-resistant adhesives, such as epoxy, are ideal for areas exposed to direct sunlight, as they maintain their integrity and strength over time.
- Mechanical Vibration: RVs are subject to vibrations during travel, which can impact the durability of the adhesive bond. A high-strength construction adhesive designed to resist shear forces is essential for maintaining stability in these conditions.
- Wood Type: Different wood species have varying densities and porosity, influencing glue absorption. Selecting a glue that penetrates well, such as PVA (polyvinyl acetate), provides a stronger bond for porous woods commonly used in RV construction.
What Impact Do Humidity and Temperature Have on Adhesive Performance?
- Humidity: High humidity can lead to moisture absorption by certain adhesives, which may weaken the bond over time.
- Temperature: Extreme temperatures can either speed up or slow down the curing process of adhesives, impacting their effectiveness based on the conditions during application.
- Optimal Conditions: Each adhesive type has specific temperature and humidity ranges where they perform best, making it crucial to consider these factors when selecting the best glue to repair RV wood walls.
- Long-term Stability: Adhesives exposed to fluctuating humidity and temperature may degrade faster, leading to potential failures in the repair over time.
High humidity can lead to moisture absorption by certain adhesives, which may weaken the bond over time. For instance, water-based glues can become less effective when excess moisture is present, potentially leading to delamination or reduced adhesion strength.
Extreme temperatures can either speed up or slow down the curing process of adhesives, impacting their effectiveness based on the conditions during application. Adhesives exposed to very low temperatures may not cure properly, while those applied in high temperatures may set too quickly, preventing optimal bonding.
Each adhesive type has specific temperature and humidity ranges where they perform best, making it crucial to consider these factors when selecting the best glue to repair RV wood walls. For example, polyurethane adhesives often perform well in varied conditions, while some epoxy formulas may have specific temperature requirements for best performance.
Adhesives exposed to fluctuating humidity and temperature may degrade faster, leading to potential failures in the repair over time. It is essential to monitor the environmental conditions during and after the application to ensure the longevity and reliability of the adhesive bond.
What Key Considerations Should Influence Your Glue Selection for RV Wood Walls?
Choosing the right glue for repairing RV wood walls involves several key considerations to ensure a strong and durable bond.
- Type of Wood: Different woods have varying porosity and grain patterns, which can affect glue adhesion. For instance, hardwoods may require a different adhesive than softwoods due to their density and structure.
- Moisture Resistance: RV environments often expose wood to humidity and moisture, making it essential to select a waterproof glue. Products labeled as waterproof or water-resistant will prevent the adhesive from breaking down over time due to moisture exposure.
- Flexibility: RV walls experience movement due to driving and temperature changes, so adhesives that remain flexible after curing are ideal. This flexibility helps maintain the bond integrity even as materials expand and contract.
- Ease of Application: Some adhesives come in user-friendly formats like tubes or spray cans that simplify application, while others may require more complex mixing or clamping. Choosing an adhesive that is easy to apply can save time and effort during repairs.
- Curing Time: The time an adhesive takes to set and cure is crucial, especially in situations where quick repairs are needed. Opting for a fast-curing glue can minimize downtime and allow for quicker usability of the RV.
- Strength of Bond: The adhesive should provide a strong bond sufficient to hold the wood under various stresses. Checking the tensile strength rating of the glue can help ensure it will withstand the rigors of travel and use.
- Toxicity and Fumes: Many adhesives emit harmful fumes during application or curing, which can be problematic in the enclosed spaces of an RV. Selecting low-VOC or non-toxic options is beneficial for maintaining a safe living environment.
How Important Are Adhesion Strength and Flexibility When Choosing Glue?
When selecting the best glue to repair RV wood walls, adhesion strength and flexibility are critical factors to consider.
- Adhesion Strength: This refers to the glue’s ability to bond strongly to the wood surfaces. A strong adhesive will ensure that the repair is durable and can withstand the movement and vibrations typical in an RV, preventing the bond from breaking over time.
- Flexibility: Flexibility is essential for materials that may expand or contract due to temperature changes or moisture. A flexible glue can accommodate these movements without cracking or breaking, which is particularly important in the dynamic environment of an RV.
- Water Resistance: Since RVs are often exposed to varying weather conditions, choosing a glue that is water-resistant or waterproof can enhance the longevity of repairs. This property helps protect the bond from moisture damage, which could lead to wood rot or weakening over time.
- Ease of Application: The best glue should be easy to apply, allowing for precision in repairs. An adhesive that comes with a nozzle or brush applicator can help apply it evenly and minimize mess, making the repair process simpler.
- Cure Time: The time it takes for the adhesive to set and cure is also a significant consideration. A glue that cures quickly allows for faster repairs, but it’s important to ensure it provides sufficient working time to adjust pieces as needed before it sets.
What Is the Significance of Drying Time in RV Repairs?
Using the best glue to repair RV wood walls can significantly enhance repair outcomes. Popular options include marine-grade adhesives, which offer water resistance and are designed for high-stress environments. Choosing the right adhesive, coupled with allowing sufficient drying time, can ensure a lasting repair that withstands the rigors of travel and fluctuating weather conditions.
Best practices for ensuring proper drying time include applying the adhesive in a controlled environment where temperature and humidity can be managed. It is advisable to check the manufacturer’s instructions regarding clamping times and curing conditions. This proactive approach can prevent future repair issues and enhance the durability of the RV structure.
What Are the Best Practices for Applying Glue When Repairing RV Wood Walls?
When repairing RV wood walls, it’s essential to follow certain best practices for applying glue to ensure a strong and lasting bond.
- Choose the Right Glue: Select a high-quality wood adhesive that is waterproof and designed for use in high-stress environments.
- Prepare the Surface: Ensure that the surfaces to be glued are clean, dry, and free of old adhesive, dust, or grease.
- Apply Evenly: Use a brush or a spreader to apply an even coat of glue to both surfaces for maximum adhesion.
- Clamp the Joint: After applying the glue, use clamps to hold the pieces together during the curing process to prevent movement.
- Follow Curing Time: Allow the glue to cure for the recommended time before applying any stress to the joint or reassembling the RV.
Choosing the right glue is vital; look for adhesives that offer durability and resistance to moisture since RVs are often exposed to varying climates. A polyurethane or epoxy-based glue is typically recommended for wood repairs in RVs due to their strong bonding properties and waterproof characteristics.
Preparing the surface is another crucial step; any dust, grease, or old adhesive can interfere with the bonding process. Use sandpaper to roughen the surface slightly, which helps the glue adhere better, and wipe it down with a clean cloth to remove any debris.
When applying the glue, use a brush or a spreader to ensure an even layer on both surfaces. A thin, uniform application is preferable, as this will provide a better bond without excessive glue oozing out when clamped.
Clamping the joint is essential to maintain pressure on the glued surfaces during the curing process. This prevents any movement that could compromise the bond and ensures that the glue sets properly, creating a robust repair.
Lastly, always follow the manufacturer’s recommended curing times for the glue you are using. Rushing this step can lead to weak bonds, so it’s best to be patient and allow the adhesive to fully cure before reassembling or putting stress on the repair.
How Can You Prepare the Surface for Optimal Adhesion?
Preparing the surface for optimal adhesion is crucial for effective bonding when using glue to repair RV wood walls.
- Clean the Surface: Thoroughly clean the area to remove dust, dirt, grease, and old adhesive residues.
- Sand the Wood: Lightly sand the surfaces to create a rough texture, which enhances the glue’s ability to grip the wood fibers.
- Dry the Surface: Ensure that the wood is completely dry before applying any adhesive, as moisture can weaken the bond.
- Use a Primer: Consider applying a primer specifically designed for wood surfaces to further improve adhesion.
- Check for Structural Integrity: Inspect the wood for any signs of rot or damage, and repair or replace compromised areas before gluing.
Cleaning the surface is the first step; it eliminates contaminants that can interfere with adhesion, ensuring a stronger bond. Use a mild detergent and water solution or a suitable cleaner, and allow the surface to dry completely.
Sanding the wood helps to remove any gloss from previous finishes and creates a textured surface for the glue to adhere to, which is particularly important for smooth or varnished surfaces. Use fine-grit sandpaper to prevent damaging the wood while achieving a good grip.
Moisture can significantly weaken adhesive bonds, so it’s essential to ensure that the wood is completely dry before applying glue. A moisture meter can help determine if the wood has an acceptable moisture content for bonding.
Applying a primer can help seal the wood and provide an even surface for the adhesive to bond to, especially if you are using a specific type of glue that benefits from this preparation. Make sure to choose a primer compatible with both the wood and the glue type.
Finally, checking the structural integrity of the wood is vital; any weak or rotted areas may compromise the repair. If you find any damage, it’s best to replace those sections or reinforce them before proceeding with adhesive application.
What Techniques Ensure a Strong and Durable Bond After Glue Application?
Several techniques can enhance the strength and durability of a bond after glue application, especially when repairing RV wood walls.
- Surface Preparation: Properly preparing the surfaces to be bonded is crucial. This involves cleaning the surfaces of dust, grease, and old adhesive, and may include sanding to create a rough texture, which helps the glue adhere more effectively.
- Choosing the Right Glue: Selecting the appropriate adhesive is essential for a lasting bond. For wood repairs in an RV, polyurethane or epoxy glues are often recommended due to their strong bonding capabilities and resistance to moisture and temperature changes.
- Clamp or Weight Application: After applying glue, using clamps or weights to hold the pieces together ensures that even pressure is maintained during the curing process. This prevents gaps between the surfaces and allows the adhesive to form a tight bond as it dries.
- Optimal Temperature and Humidity: Applying glue in the right environmental conditions can significantly affect the bond’s strength. Most adhesives perform best at moderate temperatures and humidity levels, so it’s important to follow the manufacturer’s recommendations for ideal conditions.
- Curing Time: Allowing adequate time for the glue to cure fully is critical for achieving maximum strength. Each adhesive has its own curing time; rushing this process can compromise the bond’s durability and longevity.
- Sealant Application: After the glue has cured, applying a sealant can protect the bond from moisture and environmental damage. This additional layer helps safeguard against potential issues, especially in the high-moisture environment of an RV.