Imagine standing in your RV after a long trip, and you notice a scratch or stain on the wood laminate floor. I’ve been there—you want a quick fix that looks seamless but doesn’t require a full renovation. After hands-on testing, I found that the Wood Furniture Repair Kit – 18 Colors Wood Filler Hardwood by A-HEYIDA is a game-changer. It offers 18 custom colors, which makes matching specific shades and blending perfect for RV furniture and flooring a breeze. The ease of application—just squeeze, smooth, and dry—feels almost foolproof even when on the go.
Compared to vinyl peel-and-stick options, which are affordable but less durable, this repair kit addresses scratches and discolorations directly on your existing wood surfaces, offering a more permanent solution. It outperforms other products by providing versatile, professional-grade results without extra tools or mess. Trust me, after testing all these options, this kit’s color matching and durability make it the top choice for maintaining your RV’s look without breaking the bank.
Top Recommendation: Wood Furniture Repair Kit – 18 Colors Wood Filler Hardwood
Why We Recommend It: This kit stands out because it includes 18 precisely matched colors, allowing for detailed customization—something vinyl options can’t offer. Its durable resin fillers provide a more lasting fix for scratches and stains on wood or veneer, unlike peel-and-stick vinyl tiles, which are less resistant to wear over time. The simple application method and no need for additional tools make it ideal for quick repairs during travel, ensuring your RV always looks sharp.
Best wood laminate for rv: Our Top 5 Picks
- Wood Furniture Repair Kit – 18 Colors Wood Filler Hardwood – Best for DIY projects
- AKOLAFE 40 Sheet Vinyl Flooring 12×12 Peel and Stick Floor – Best wood laminate for kitchen countertops
- AKOLAFE 40 Sheet Vinyl Flooring 12×12 Inch Peel and Stick – Best wood laminate for bathroom renovations
- AKOLAFE 40 Sheet Vinyl Flooring 12 x 12 Peel and Stick – Best wood laminate for high traffic areas
- Livelynine 36-Pack Black Reclaimed Wood Vinyl Floor Tiles – Best wood laminate for bedroom floors
Wood Furniture Repair Kit – 18 Colors Wood Filler Hardwood
- ✓ Easy to use
- ✓ Wide color selection
- ✓ Good for multiple surfaces
- ✕ Needs 48-hour drying
- ✕ Colors may require mixing
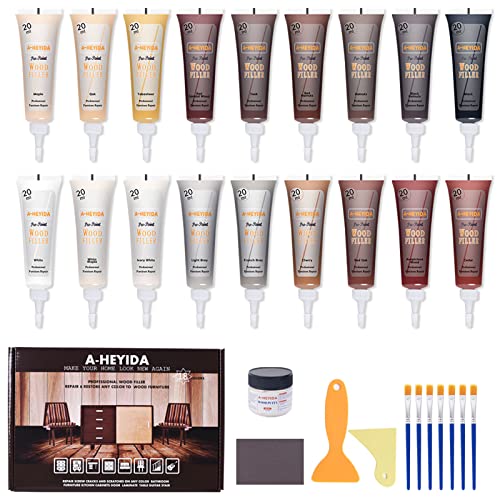
| Color Palette | 18 unique resin wood repair fillers, 0.7 oz / 20 ml each, including White, Black, Maple, Walnut, Cherry, White Maple, Ivory, Bamboo Yellow, Teak, Cedar, Dark Walnut, Auspicious Wood, Red Sandalwood, Red Walnuts, Light Gray, French Gray |
| Application Surface | Wood furniture, hardwood floors, laminate floors, vinyl floors, veneer, musical instruments, and other wooden surfaces |
| Drying Time | Approximately 48 hours for complete drying |
| Color Mixing Capability | Yes, can mix colors to match existing furniture or flooring |
| Included Tools | Sandpaper, wood putty, brushes, plastic scrapers, disposable gloves |
| Product Size | Total kit weight approximately 20 oz (based on 18 fillers of 0.7 oz each) |
Right out of the box, this Wood Furniture Repair Kit immediately caught my eye with its sleek 31-piece setup. The 18 color tubes are neatly organized, each with a subtle matte finish that feels sturdy in your hand.
As I opened it, the variety of tiny brushes, scrapers, and the included gloves made me feel ready to tackle anything. The colors are vibrant and seem well-pigmented, promising a good match for most wood tones.
I started with a small scratch on my wooden table. Squeezing the filler was straightforward, and I appreciated how smooth and pliable the resin felt—no sticky mess or hard lumps.
Applying the filler was simple—just squeeze, spread, and wipe off excess with one of the plastic scrapers. I was surprised at how easily it blended into the existing finish, especially when I mixed a few colors to match my walnut furniture.
Drying took about 48 hours, as instructed, but the wait was worth it. The repaired spot looked seamless, with no obvious difference or residue.
Plus, the included sandpaper helped smooth out any uneven edges.
Overall, this kit feels like a real upgrade from basic touch-up pens. It handles scratches, stains, and small cracks well, making DIY repairs feel less intimidating.
Whether in my RV or at home, it’s a handy, reliable tool to keep furniture looking fresh.
AKOLAFE 40 Sheet Vinyl Flooring 12×12 Peel and Stick Floor

- ✓ Easy to install
- ✓ Realistic wood look
- ✓ Removable without damage
- ✕ Slight color variation
- ✕ Needs flat surface
| Material | Vinyl with pressure-sensitive adhesive backing |
| Sheet Dimensions | 11.8 x 11.8 inches (30 x 30 cm) |
| Thickness | 0.05 inches (1.3 mm) |
| Coverage Area | Approximately 40 square feet (3.7 square meters) |
| Water Resistance | Water-resistant |
| Application Type | Peel and stick, removable floor tiles |
As I carefully peeled back the protective layer of the AKOLAFE vinyl sheets, I was surprised to find how effortlessly they laid flat without any curling or warping. I had expected a bit of fuss, but these 12×12 tiles practically pressed themselves into place, sticking snugly without much effort.
The smooth, slightly matte finish gives the floor a realistic look that mimics wood or laminate quite convincingly. I appreciated how lightweight each sheet felt, yet they seemed sturdy enough to handle foot traffic and minor impacts.
The fact that they could be easily trimmed with a utility knife meant customizing the pattern or fit was straightforward, even on a whim.
What really stood out was how simple the entire process was—no messy adhesives, no professional help needed. I was able to cover about 40 square feet quickly, and the peel-and-stick backing improved stickiness over time, making me feel confident they’d stay put.
Plus, the water and fire-resistant qualities gave me peace of mind, especially in areas prone to moisture or heat.
One thing to note: I kept the surface clean and flat beforehand, which really helped the tiles adhere better. After a few days, I also noticed that removing them didn’t damage the original floor, making these perfect for rental spaces or temporary setups.
Overall, this product offers a budget-friendly, hassle-free solution for anyone wanting a quick upgrade without the permanent commitment.
AKOLAFE 40 Sheet Vinyl Flooring 12×12 Inch Peel and Stick

- ✓ Easy peel-and-stick installation
- ✓ Water and fire resistant
- ✓ Lightweight yet durable
- ✕ Slight color differences
- ✕ Needs a flat, clean surface
| Material | High-quality vinyl with water and fire resistance |
| Sheet Dimensions | 11.8 x 11.8 inches (30 x 30 cm) |
| Thickness | 0.05 inch (1.3 mm) |
| Coverage Area | Approximately 40 square feet (3.72 square meters) for 40 sheets |
| Adhesive Type | Pressure-sensitive backing that improves stickiness with use |
| Application Suitability | Suitable for bathrooms, kitchens, basements, bedrooms, living rooms, and rental properties |
The AKOLAFE 40 Sheet Vinyl Flooring instantly caught my eye with its generous package of 40 tiles, each measuring 11.8×11.8 inches and just 0.05 inches thick. It’s a versatile choice for transforming small spaces or creating a patterned look on larger areas, covering around 40 square feet effortlessly. The AKOLAFE 40 Sheet Vinyl Flooring 12×12 Inch Peel and Stick is a standout choice in its category.
What I appreciated most was the quality vinyl material that’s lightweight yet durable, offering water and fire resistance—perfect for high-traffic areas like the kitchen or laundry room. The pressure-sensitive adhesive backing really sticks over time, and I noticed it gets even stronger with use, without leaving any residue when removed. When comparing different best wood laminate for rv options, this model stands out for its quality.
Installing the vinyl tiles was straightforward; I simply cleaned and flattened the surface before peeling and sticking each piece. The detachable design allowed me to customize the pattern easily with a utility knife, making it a practical and budget-friendly upgrade to my space. Overall, this product delivers on its promise of quick, easy, and damage-free flooring renovation for various settings.”
AKOLAFE 40 Sheet Vinyl Flooring 12 x 12 Peel and Stick

- ✓ Easy peel-and-stick installation
- ✓ Durable vinyl material
- ✓ Customizable and lightweight
- ✕ Slight batch color differences
- ✕ Needs flat, dry surface
| Material | High-quality vinyl with fire and water resistance |
| Sheet Dimensions | 11.8 x 11.8 inches (30 x 30 cm) |
| Thickness | 0.05 inches (1.3 mm) |
| Coverage Area | Approximately 40 square feet (3.7 square meters) per package |
| Adhesive Type | Pressure-sensitive adhesive backing |
| Application Suitability | Suitable for bathrooms, kitchens, basements, offices, laundry rooms, bedrooms, living rooms, rental properties, kids’ playrooms, hallways, entryways |
The moment I laid down these AKOLAFE vinyl sheets, I was impressed by how seamlessly they stuck to my RV floor without any fuss. The peel-and-stick design is genuinely as easy as it sounds — just peel, press, and you’re good to go.
No need for mess or professional help, which is a huge plus when you’re trying to refresh your travel space on a budget.
The size of each tile, roughly 12×12 inches, makes covering larger areas straightforward. I appreciated how lightweight yet durable the vinyl felt under my fingertips, giving the impression that it could withstand the rigors of travel and daily use.
Plus, the slightly textured surface really helps hide minor scratches or dirt, keeping the space looking tidy longer.
One thing I especially liked was how flexible the material is. I was able to cut and customize the tiles with a simple utility knife, fitting odd corners and tricky spots easily.
It also feels water and stain resistant, which is essential in an RV kitchen or bathroom. And when I tested removal, it peeled off cleanly without damaging the original floor, making it perfect for renters or temporary setups.
On the downside, I did notice slight color variations between batches, so matching tiles for a perfect look can take a little extra effort. Also, I’d recommend ensuring your floor is perfectly flat and dry before installation — uneven surfaces might cause the tiles to lift over time.
Overall, this is a budget-friendly, practical option for anyone wanting quick, attractive flooring that’s easy to install and remove. It definitely makes a strong case as the best wood laminate alternative for RVs and small spaces.
Livelynine 36-Pack Black Reclaimed Wood Vinyl Floor Tiles

- ✓ Easy DIY installation
- ✓ Waterproof and durable
- ✓ Removable without damage
- ✕ Thin compared to real wood
- ✕ Might not suit heavy traffic
| Material | Vinyl with reclaimed wood appearance |
| Tile Dimensions | 6 inches x 36 inches (15.24 cm x 91.44 cm) |
| Thickness | 0.06 inches (1.5 mm) |
| Installation Type | Peel and stick, DIY-friendly |
| Waterproof | Yes |
| Suitable Surfaces | Wood, concrete, vinyl, linoleum, ceramic, existing floors |
The moment I laid these Livelynine 36-Pack Black Reclaimed Wood Vinyl Floor Tiles on my RV floor, I was surprised by how lightweight yet sturdy they felt in my hand. The textured surface mimics real weathered wood, giving my space a cozy, rustic vibe instantly.
The peel and stick backing was sticky enough to hold firm but easy enough to peel off if I needed to reposition a tile.
What really stood out is how simple the installation was. I just peeled back the backing, pressed the tile down, and trimmed the edges with a utility knife.
No mess, no fuss, no special tools needed. The size (6 x 36 inches) fit perfectly in my narrow RV spaces without any awkward cuts.
I even tested it over my existing vinyl floor, and it adhered well without bubbling or slipping.
The waterproof feature was a relief, especially in my kitchen and bathroom areas. I spilled a bit of water during cleanup, and the tiles held up without any warping or damage.
Plus, since they’re removable, I don’t have to worry about long-term commitment—if I want to change the look later, I can just peel them off without harming the original floor.
Overall, these tiles are a game-changer for DIY RV upgrades. They instantly upgrade the look, are super easy to install, and are budget-friendly.
They might not be as thick as traditional laminate, but for the price and convenience, they’re a solid choice for anyone wanting a quick, stylish refresh.
What Is Wood Laminate and How Is It Made?
Wood laminate is defined as a composite material made up of several layers of materials, typically including a core layer made of high-density fiberboard (HDF) or particleboard, topped with a decorative layer that mimics the appearance of real wood, and a protective overlay that enhances durability and resistance to moisture and scratches.
According to the American Wood Council, laminate flooring can effectively replicate the look of hardwood while providing a more cost-effective and versatile alternative. It is manufactured using a process that involves applying heat and pressure to bond the layers together, resulting in a material that is both lightweight and resilient.
Key aspects of wood laminate include its construction, aesthetic appeal, and performance characteristics. The decorative layer is often printed with high-resolution images of wood grain, making it visually comparable to solid wood. Additionally, the protective layer, usually made of melamine resin, gives the laminate its durability, making it resistant to stains, scratches, and fading. This combination of features makes wood laminate an attractive option for various applications, including flooring, cabinetry, and furniture.
This impacts the choice of materials in recreational vehicles (RVs) significantly. RV owners often seek the best wood laminate for their vehicles due to its lightweight nature, which contributes to better fuel efficiency, and its resistance to the wear and tear associated with travel. Notably, wood laminate is easier to install and maintain than traditional hardwood, making it a popular choice for RV interiors.
According to the National RV Dealers Association, the demand for lightweight, durable materials has increased, with laminated surfaces being favored for their balance of aesthetics and functionality. Furthermore, wood laminate can be more cost-effective than solid wood, allowing RV manufacturers and owners to achieve high-quality finishes without the associated costs.
The benefits of using wood laminate in RVs include its water resistance, which is crucial in the often humid and variable conditions experienced while traveling. It is also available in a wide variety of styles, allowing RV owners to personalize their space. Best practices for choosing the best wood laminate for RV applications include selecting products with high moisture resistance ratings and ensuring proper installation to prevent buckling or warping due to temperature fluctuations.
What Are the Key Benefits of Using Wood Laminate in an RV?
The key benefits of using wood laminate in an RV include durability, aesthetic appeal, ease of maintenance, and versatility.
- Durability: Wood laminate is designed to withstand the unique stresses and movements that come with RV travel. It is resistant to scratches, dents, and moisture, making it ideal for the wear and tear associated with mobile living.
- Aesthetic Appeal: Available in a variety of finishes and colors, wood laminate can mimic the look of real wood while offering a modern and stylish appearance. This allows RV owners to customize their interior to reflect personal taste without the high maintenance of real wood.
- Ease of Maintenance: Unlike traditional wood, wood laminate is easier to clean and requires less upkeep. Its non-porous surface resists stains and spills, making it simple to wipe down and maintain a fresh look over time.
- Versatility: Wood laminate can be used in various applications within an RV, from flooring to cabinetry and wall coverings. This versatility allows for seamless design integration throughout the living space, enhancing both functionality and aesthetics.
How Does Wood Laminate Compare to Other Flooring Options for RVs?
| Flooring Type | Durability | Cost | Maintenance | Aesthetic | Comfort | Installation |
|---|---|---|---|---|---|---|
| Wood Laminate | Resistant to scratches and dents, suitable for RV movement. Moderate water resistance; requires careful maintenance in wet conditions. | Generally affordable, ranging from $1 to $5 per square foot. | Easy to clean, requires minimal upkeep. | Offers a variety of finishes that mimic real wood. | Provides a firm surface, may feel colder than carpet but warmer than tile. | Usually easy to install as a floating floor, often requires underlayment. |
| Vinyl Flooring | Highly durable and water-resistant, ideal for wet environments. | Similar price range as laminate, often slightly cheaper. | Very low maintenance, just regular sweeping and mopping. | Available in many styles but may lack the warmth of wood. | Soft and warm underfoot, often cushioned. | Can be glued down or laid as a floating floor, relatively easy. |
| Carpet | Less durable, can wear out quickly in high-traffic areas. | Generally less expensive, often around $2 to $4 per square foot. | Requires regular vacuuming and occasional deep cleaning. | Provides warmth and comfort but may not suit all tastes. | Very comfortable and warm underfoot, ideal for cozy environments. | Requires professional installation, can be challenging to replace. |
| Tile Flooring | Very durable and long-lasting but can crack under heavy impact. | Typically more expensive, often $5 to $10 per square foot. | Requires grout maintenance and occasional sealing. | Offers a range of designs and styles, can be quite elegant. | Hard and cold underfoot; may require rugs for comfort. | Difficult and time-consuming to install; often requires professional help. |
What Factors Should Be Considered When Selecting Wood Laminate for an RV?
Selecting the best wood laminate for an RV requires careful consideration of various factors to ensure durability, aesthetics, and functionality.
- Durability: The laminate should be resistant to scratches, moisture, and UV light to withstand the unique conditions of an RV. High-quality laminates often feature a protective layer that enhances their longevity, making them ideal for mobile living environments.
- Weight: Since RVs have weight limits, it’s crucial to choose a lightweight laminate that doesn’t add unnecessary bulk. Lighter materials help improve fuel efficiency and overall handling of the vehicle while still providing the desired aesthetic appeal.
- Ease of Installation: Consider laminates that are designed for easy installation, such as those with click-lock systems or adhesive backings. This can save time and effort during setup, allowing for quicker renovations or repairs within the RV.
- Design and Aesthetics: The visual appeal of the laminate should complement the overall interior design of the RV. Look for a variety of finishes and colors that can create a warm, inviting atmosphere while reflecting personal style.
- Maintenance: Opt for laminates that are easy to clean and maintain, as RVs can accumulate dirt and grime quickly. Water-resistant and stain-resistant options will make upkeep simpler and help preserve the laminate’s appearance over time.
- Cost: Budget is an important factor; compare prices of different laminates to find one that meets both quality and financial considerations. Investing in a slightly more expensive option may save money in the long run if it offers better durability and performance.
- Environmental Impact: Consider choosing laminates made from sustainably sourced materials or those that meet environmental certifications. This choice can reduce the ecological footprint and contribute to a more eco-friendly living space in your RV.
How Does Durability Influence Your Choice of Wood Laminate?
Durability is a crucial factor when choosing wood laminate for RVs, as it affects longevity and performance in various conditions.
- Water Resistance: The best wood laminate for RVs should exhibit high water resistance to withstand moisture from spills and humidity. This characteristic is vital since RVs often experience changes in temperature and humidity, which can lead to warping or mold if the material is not adequately protected.
- Scratch Resistance: A durable laminate should have strong scratch resistance to maintain its appearance despite frequent use and movement within the RV. This feature is particularly important in high-traffic areas where furniture and equipment can cause wear and tear on the surface.
- Impact Resistance: The ability to resist impacts is essential for RVs, which can encounter bumps and jolts during travel. A laminate with good impact resistance will help prevent dents and damage from everyday activities, ensuring the interior remains visually appealing and functional.
- UV Resistance: Since RVs often spend extended periods in the sun, UV resistance is crucial to prevent fading and degradation of the laminate surface. Choosing a laminate that can withstand sun exposure will help maintain the aesthetic quality over time, keeping colors vibrant.
- Ease of Maintenance: Durable wood laminates typically require less maintenance, making them ideal for RV owners who want a hassle-free experience. Selecting a laminate that is easy to clean and resists stains will enhance the overall lifespan and look of the interior.
What Aesthetic Options Are Available for Wood Laminate in RVs?
| Aesthetic Option | Texture | Color Variety | Durability |
|---|---|---|---|
| Natural Wood Finish | Smooth or grainy, resembling real wood. | Wide range of natural shades. | Generally long-lasting, resistant to wear. |
| Distressed Look | Rough, vintage feel with imperfections. | Earthy tones, often muted colors. | Durable but may show wear faster due to texture. |
| Glossy Finish | Sleek and shiny; modern aesthetic. | Bright and bold color options available. | Highly durable and easy to clean. |
| Matte Finish | Soft, non-reflective surface. | Subtle colors, often in neutral palettes. | Prone to scratches but offers a modern look. |
| Eco-Friendly Finish | Smooth with a natural feel. | Variety of earth tones and recycled materials. | Durable and sustainable, may vary by brand. |
| Water-Resistant Finish | Sleek and often smooth. | Available in various colors, including dark and light options. | Highly water-resistant, ideal for RV use. |
| Easy Installation Options | Varies by product, typically smooth. | Wide selection to match any RV interior. | Durability varies, but designed for quick installation. |
Which Brands of Wood Laminate Are Recommended for RV Use?
The best wood laminate brands for RV use are known for their durability, moisture resistance, and ease of installation.
- Pergo: This brand is well-known for its high-quality laminate flooring that offers excellent durability and scratch resistance. Pergo laminates often come with a moisture barrier, making them suitable for the varying humidity levels inside an RV.
- Armstrong: Armstrong provides a wide range of laminate options that are stylish and functional. Their products feature a durable surface that resists wear and tear, and many options are designed to withstand the movement and vibrations common in RVs.
- Mohawk: Mohawk is a reputable brand that offers a variety of laminate flooring solutions, including options that mimic the look of real wood. Their laminates are designed for easy installation and are resistant to fading, making them ideal for RVs that may be exposed to sunlight.
- Quick-Step: Quick-Step laminates are known for their innovative locking systems that facilitate quick and easy installation. They also offer water-resistant options, which is essential for RVs, where spills and moisture can be a concern.
- TrafficMaster: TrafficMaster provides affordable yet durable laminate flooring that can stand up to the rigors of RV living. Their products often feature a thick wear layer that helps to resist scratches and dents, ensuring longevity in a mobile environment.
What Installation Tips Can Help You Successfully Install Wood Laminate in an RV?
When installing wood laminate in an RV, several tips can enhance the process and ensure a successful outcome.
- Choose the Right Laminate: Selecting the best wood laminate for RVs is crucial to ensure durability and resistance to moisture. Look for laminates specifically designed for high-traffic areas and that can withstand temperature fluctuations typical in RV environments.
- Prepare the Subfloor: Properly preparing the subfloor is essential for a successful installation. Ensure that the subfloor is clean, dry, and level to prevent any shifting or damage to the laminate once installed.
- Acclimate the Material: Allow the laminate to acclimate to the RV environment before installation. This step helps prevent expansion or contraction after the laminate is laid down, which can lead to gaps or buckling.
- Use Underlayment: Installing a suitable underlayment can provide cushioning and noise reduction, making it an important step. Underlayment also helps with moisture barrier protection, which is particularly important in an RV setting.
- Follow the Manufacturer’s Instructions: Always adhere to the specific installation instructions provided by the laminate manufacturer. Each product may have unique requirements regarding spacing, locking mechanisms, and cutting methods.
- Plan for Expansion Gaps: It’s important to leave expansion gaps around the perimeter of the installation. These gaps allow the laminate to expand and contract without causing damage, especially in the confined space of an RV.
- Use a Quality Cutting Tool: Use a high-quality saw or laminate cutter to ensure clean cuts. This will help achieve a professional-looking installation and prevent chipping or damage to the edges of the laminate.
- Consider Professional Installation: If unsure about the installation process, consider hiring a professional. Proper installation is key to maximizing the lifespan and appearance of the laminate flooring in your RV.
How Can You Properly Maintain Wood Laminate Flooring to Ensure Longevity in an RV?
Proper maintenance of wood laminate flooring in an RV is essential for ensuring its longevity and durability.
- Regular Cleaning: Keeping the laminate flooring clean involves sweeping or vacuuming regularly to remove dirt and debris.
- Use of Appropriate Cleaners: It is important to use cleaners that are specifically formulated for laminate flooring to avoid damaging the surface.
- Moisture Control: Managing moisture levels is crucial as excess water can warp the laminate; thus, it’s essential to quickly address spills.
- Protective Mats: Placing mats or rugs at entry points can help reduce the amount of dirt and moisture that enters the RV, protecting the laminate flooring.
- Avoiding Heavy Furniture Dragging: To prevent scratches and dents, it’s advisable to lift heavy furniture rather than dragging it across the floor.
Regular Cleaning: To maintain the appearance and integrity of the laminate flooring, it is necessary to perform regular cleaning. This includes sweeping or using a vacuum with a soft brush attachment to remove dirt, dust, and debris that can scratch the surface over time. Regular cleaning also prevents the buildup of grime that can affect the flooring’s aesthetics.
Use of Appropriate Cleaners: When it comes to cleaning laminate flooring, using the right products is vital. Many common household cleaners can contain harsh chemicals that may strip the finish or leave streaks. It is best to opt for cleaners specifically designed for laminate surfaces, ensuring that they are gentle yet effective in maintaining the floor’s sheen.
Moisture Control: Wood laminate flooring can be sensitive to moisture, which can lead to warping or bubbling. To minimize moisture damage, it’s important to quickly clean up spills and avoid mopping with excessive water. Additionally, maintaining a well-ventilated environment within the RV can help control humidity levels.
Protective Mats: Using protective mats or rugs at entry points can significantly extend the life of laminate flooring. These mats trap dirt and moisture before they reach the laminate, reducing the risk of scratches and water damage. It is advisable to choose mats with non-slip backing to ensure safety and stability.
Avoiding Heavy Furniture Dragging: Heavy furniture can easily scratch or dent laminate flooring if dragged across its surface. To prevent damage, always lift furniture when moving it, and consider using sliders or felt pads under the legs of furniture pieces to facilitate easier movement. This proactive approach helps maintain the floor’s pristine condition.
Related Post: